PlotBot: Difference between revisions
No edit summary |
|||
| (13 intermediate revisions by the same user not shown) | |||
| Line 1: | Line 1: | ||
{{Project | |||
|name=Base48 PlotBot | |name=Base48 PlotBot | ||
|image= | |image=Turtle-bots.jpg | ||
|founder=niklasroy.com/robotfactory | |founder=niklasroy.com/robotfactory | ||
|coops=lubko, vanicka | |coops=lubko, vanicka | ||
|status=active | |status=active | ||
|tags=hw | |tags=hw | ||
|shortdesc= | |shortdesc=Whiteboard drawing bot | ||
|created=2025-25-09 | |created=2025-25-09 | ||
}}https://hackaday.com/2025/09/02/this-plotter-knows-no-boundaries/ | }} | ||
== What is this == | |||
A whiteboard drawing bot project. We didn't design the thing, but we built a couple of robots. Along the way, we made modifications and learned a lot. | |||
Among things we learned is that it's a perfect project to get start with robotics. | |||
Here's where it comes from: | |||
https://hackaday.com/2025/09/02/this-plotter-knows-no-boundaries/ | |||
https://www.niklasroy.com/robotfactory/ | https://www.niklasroy.com/robotfactory/ | ||
The above link actually contains everything needed to get the bot going. Below are adjustments for parts we had. | |||
== Our modifications == | |||
Our FreeCAD model is here: [https://codeberg.org/lubko/turtle-robot/src/branch/main/tiny_turtle_plotter_CAD.FCStd tiny_turtle_plotter_CAD.FCStd] | |||
Modified parts typically have "new" in their name. Sorry if it's messy. First time FreeCAD. | |||
<gallery> | |||
File:555688595 1215584740611888 2776984424721907890 n.jpg|3D-printed parts for original build | |||
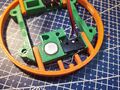
File:Turtle-endstop.jpg|Different endstop microswitch | |||
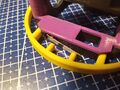
File:Turtle-switch-ball.jpg|Different size roller and endstop | |||
File:Turtle-ball.jpg|Roller ball | |||
File:Drawbot-ball2.jpg|Roller ball | |||
File:Turtle-wheels.jpg|Wheels and tyres | |||
File:Turtle-wheels1.jpg|Wheels | |||
File:Turtle-carriage.jpg|Wheel carriage | |||
File:Turtle-steppers.jpg|Stepper motors | |||
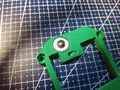
File:Turtle-pen-lifter.jpg|Hacked pen lifter | |||
</gallery> | |||
=== Endstops === | |||
The microswitches come in different shapes and forms. We added extra prongs to the bumper ring to engage with wider range of microswitches. | |||
=== Roller ball === | |||
We used a larger furniture ball, which in turn means we had to make room in the parts in two lowest layer and make the wheels larger. | |||
=== Wheels === | |||
The wheels were too small, possibly because our roller ball was bigger. They were also rubbing against layers 1 and 2, and appeared to be made for 5mm shaft in the stepper (our had 6mm). This has, of course, thrown off the geometry. a little. | |||
We also had different size tyres. | |||
=== Power banks === | |||
Ones we had didn't fit. We adjusted the layers 1 and made different versions of the upper ring to hold them in place. | |||
=== Pen lifter === | |||
One robot is equipped with a more precise pen lifter that utilizes linear motion bearings (LM8) on 8mm rods. | |||
== Control Board == | |||
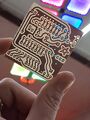
[[File:Turtle-bot-v3-pcb-back-etch.png|thumb|Traces can be drawn on copper laminate (cuprexit) with toner transfer technique and chemically etched. Negative printout for PCB etching: [https://codeberg.org/lubko/turtle-robot/src/branch/main/artifacts/turtle-bot-v3-pcb-back-etch.pdf turtle-bot-v3-pcb-back-etch.pdf]]] | |||
We've drawn a PCB that can be sent to a manufacturing house, but is also optimized for chemical or CNC etching! | |||
Schematic: [https://codeberg.org/lubko/turtle-robot/src/branch/main/artifacts/turtle-bot-v3-schematic.pdf turtle-bot-v3-schematic.pdf] | |||
Fabrication notes: [https://codeberg.org/lubko/turtle-robot/src/branch/main/artifacts/turtle-bot-v3-pcb-fab-notes.pdf turtle-bot-v3-pcb-fab-notes.pdf] | |||
Negative printout for PCB etching: [https://codeberg.org/lubko/turtle-robot/src/branch/main/artifacts/turtle-bot-v3-pcb-back-etch.pdf turtle-bot-v3-pcb-back-etch.pdf] | |||
<gallery> | |||
File:630198759 1327012059469155 4819732943989781073 n.jpg|Cutting copper boards | |||
File:631316442 1327012126135815 8139523202493073450 n.jpg|Chilling in a pool after toner transfer | |||
File:640173458 1339273461576348 8523389435759424901 n.jpg|Toner transfer done, paper peeled off | |||
File:633395964 1327012302802464 3349586654434092500 n.jpg|Copper etching | |||
File:640446084 1339273764909651 2435820910506464661 n.jpg|Board fully etched | |||
File:640928983 1339273704909657 7028863716144500154 n.jpg|Posing for a picture | |||
File:Turtle-front.jpg|Perfboards are a no-hassle option | |||
File:Turtle-pcb1.jpg|Back side of a perfboard | |||
</gallery> | |||
== Software == | |||
Arduino code: https://github.com/vranicka/PlotBot | |||
== Shopping list == | |||
=== CY-8H roller ball === | |||
* https://www.aliexpress.com/w/wholesale-CY%2525252d8H-10-pcs.html?spm=a2g0o.detail.search.0 | |||
=== Threaded rod === | |||
* https://www.hornbach.cz/p/zavitova-tyc-a2-m4-1m-nerez/12178521/ | |||
=== M4 nuts === | |||
* https://www.hornbach.cz/p/matice-presna-m4-sestihranna-nerez-a2-30ks/8718280/ | |||
=== Stepper === | |||
* https://www.gme.cz/v/1500758/md775047-dc-motor-krokovy-5v | |||
* https://www.aliexpress.com/w/wholesale-stepper-5v.html?spm=a2g0o.detail.search.0 | |||
=== Arduino Nano === | |||
* https://www.aliexpress.com/w/wholesale-arduino-nano.html?spm=a2g0o.productlist.search.0 | |||
* https://www.gme.cz/v/1514835/usb-c-klon-arduino-nano | |||
=== OD23xCS2.5 Rubber O-Ring === | |||
* https://www.aliexpress.com/w/wholesale-OD-23-CS-2.5-rubber-o%2525252dring.html?spm=a2g0o.productlist.search.0 | |||
=== Micro switch with 20mm-35mm lever === | |||
* https://www.gme.cz/v/1496684/zippy-sm-05s-07a0-z-mikrospinac | |||
* https://www.aliexpress.com/w/wholesale-limit-micro-switch.html?spm=a2g0o.productlist.search.0 | |||
=== ULN2803 motor driver === | |||
* https://www.gme.cz/v/1519030/taejin-htc-korea-uln2803an-darlingtonuv-proudovy-budic | |||
* https://www.aliexpress.com/w/wholesale-uln2803-dip.html?spm=a2g0o.home.search.0 | |||
== | == More pictures == | ||
<gallery | omg somebody please take a picture of it drawing and writing<gallery> | ||
File: | File:20260119 145224.jpg|Robot coming alive | ||
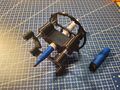
File:555534763 1215584797278549 3519708831245411009 n.jpg | File:555534763 1215584797278549 3519708831245411009 n.jpg|Robot skeleton | ||
File:PlotBot.jpg|In action | |||
File:PlotBot.jpg | |||
</gallery> | </gallery> | ||
Latest revision as of 10:19, 11 June 2026

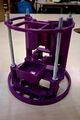
What is this
A whiteboard drawing bot project. We didn't design the thing, but we built a couple of robots. Along the way, we made modifications and learned a lot.
Among things we learned is that it's a perfect project to get start with robotics.
Here's where it comes from:
https://hackaday.com/2025/09/02/this-plotter-knows-no-boundaries/
https://www.niklasroy.com/robotfactory/
The above link actually contains everything needed to get the bot going. Below are adjustments for parts we had.
Our modifications
Our FreeCAD model is here: tiny_turtle_plotter_CAD.FCStd
Modified parts typically have "new" in their name. Sorry if it's messy. First time FreeCAD.
-
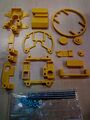 3D-printed parts for original build
 -
 Different endstop microswitch
 -
 Different size roller and endstop
 -
 Roller ball
 -
 Roller ball
 -
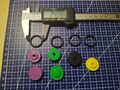 Wheels and tyres
 -
 Wheels
 -
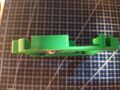
 Wheel carriage
 -
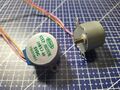 Stepper motors
 -
 Hacked pen lifter


Endstops
The microswitches come in different shapes and forms. We added extra prongs to the bumper ring to engage with wider range of microswitches.
Roller ball
We used a larger furniture ball, which in turn means we had to make room in the parts in two lowest layer and make the wheels larger.
Wheels
The wheels were too small, possibly because our roller ball was bigger. They were also rubbing against layers 1 and 2, and appeared to be made for 5mm shaft in the stepper (our had 6mm). This has, of course, thrown off the geometry. a little.
We also had different size tyres.
Power banks
Ones we had didn't fit. We adjusted the layers 1 and made different versions of the upper ring to hold them in place.
Pen lifter
One robot is equipped with a more precise pen lifter that utilizes linear motion bearings (LM8) on 8mm rods.
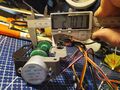
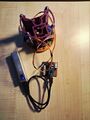
Control Board

We've drawn a PCB that can be sent to a manufacturing house, but is also optimized for chemical or CNC etching!
Schematic: turtle-bot-v3-schematic.pdf
Fabrication notes: turtle-bot-v3-pcb-fab-notes.pdf
Negative printout for PCB etching: turtle-bot-v3-pcb-back-etch.pdf
-
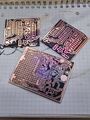
 Cutting copper boards
 -
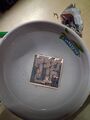 Chilling in a pool after toner transfer
 -
 Toner transfer done, paper peeled off
 -
 Copper etching
 -
 Board fully etched
 -
 Posing for a picture
 -
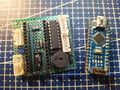 Perfboards are a no-hassle option
 -
 Back side of a perfboard


Software
Arduino code: https://github.com/vranicka/PlotBot
Shopping list
CY-8H roller ball
Threaded rod
M4 nuts
Stepper
- https://www.gme.cz/v/1500758/md775047-dc-motor-krokovy-5v
- https://www.aliexpress.com/w/wholesale-stepper-5v.html?spm=a2g0o.detail.search.0
Arduino Nano
- https://www.aliexpress.com/w/wholesale-arduino-nano.html?spm=a2g0o.productlist.search.0
- https://www.gme.cz/v/1514835/usb-c-klon-arduino-nano
OD23xCS2.5 Rubber O-Ring
Micro switch with 20mm-35mm lever
- https://www.gme.cz/v/1496684/zippy-sm-05s-07a0-z-mikrospinac
- https://www.aliexpress.com/w/wholesale-limit-micro-switch.html?spm=a2g0o.productlist.search.0
ULN2803 motor driver
- https://www.gme.cz/v/1519030/taejin-htc-korea-uln2803an-darlingtonuv-proudovy-budic
- https://www.aliexpress.com/w/wholesale-uln2803-dip.html?spm=a2g0o.home.search.0
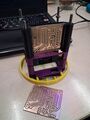
More pictures
omg somebody please take a picture of it drawing and writing
-
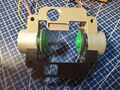
 Robot coming alive
 -
 Robot skeleton
 -
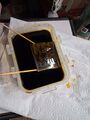
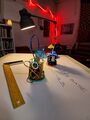 In action


